Basic Sunflower Pillow Pattern


This post contains affiliate links. Affiliate links cost you nothing, but when purchasing through these links you help me earn a small commission. This supports me and my family and my continued efforts to bring you free patterns.
Intro:
Last year I made the Autumn Sunflower Pillow and Blanket Patterns—this year I’m bringing you the Special Edition of those!! Who doesn’t love a super chunky project that works up really quick? This one also happens to be beginner friendly! It’s really basic and straight forward, with a squishy, light hearted design. It’s the perfect project to ease you into Autumn….
L, M
ps. If you want the ad-free, printable PDF of the pattern you can grab one in my Ravelry or Etsy Pattern Shops:
Notions
US 9.00 mm (size M/N) crochet hook
Needle for weaving in ends
Scissors
18” x 18” washable pillow form (insert)
Yarn
Lion Brand Wool Ease Thick & Quick (87yds/140g):
Colour A: Toasted Almond (6yds/9g) 1 skein
Lion Brand Wool Ease Thick & Quick (106yds/170g):
Colour B: Barley (7yds/11g) 1 skein
Colour C: Mustard (11yds/17g) 1 skein
Colour D: Oatmeal (225yds/361g) 3 skeins
** any super bulky weight yarn will work as long as gauge is met. Here are some of my favourite alternatives:
Lion Brand Wool Ease Thick & Quick (80% Acrylic, 20% Wool)
WeCrochet Fluff of the Andes (100% Highland Wool)
Estelle Bulky (40% Wool, 50% Acrylic, 10% Nylon)
Cascade Pacific Bulky (60% Acrylic, 40% Superwash Merino Wool)
Hue Loco Bulky (100% SW Merino)—would have to adjust amount of rnds in pattern.
Gauge
4 rnd sunflower square= 9” square (unblocked)
Final pillow panel should measure 23.5” (unblocked)
Finished Size
18”x 18” pillow
Glossary (using US Crochet Terminology)
st(s)- stitch(es)
ch- chain
ch-sp- chain space
sl st- slip stitch
YO- yarn over
SC- single crochet
DC- double crochet
tr- treble crochet
cl st(s)- cluster stitch(es)
2 DC cl – 2 double crochet cluster stitch
4 tr cl- 4 treble cluster stitch
5 tr cl- 5 treble cluster stitch
CJAYG- continuous join as you go
DC shell- group of DC stitches
How to Crochet the 2 DC cluster stitch (2 DC cl): YO, insert hook into center of circle, YO and pull up a loop, YO and pull through 2 loops on hook, YO and insert hook into center of circle, YO and pull up a loop, YO and pull through 2 loops on hook, YO and pull through 3 loops on hook, ch 1.
How to 4 tr cluster stitch (4 tr cl): YO twice and insert hook into sp, YO and pull up a loop, YO and pull through 2, YO pull through 2. Repeat 3 more times. There should be 5 loops on the hook. YO and pull through all 5 loops.
How to 5 tr cluster stitch (5 tr cl): YO twice and insert hook into sp, YO and pull up a loop, YO and pull through 2, YO pull through 2. Repeat 4 more times. There should be 6 loops on the hook. YO and pull through all 6 loops.
Pattern Notes
In some cases, the video tutorials have been used for other patterns. Please follow the yarn recommendations, hook size and stitch counts in the written pattern- the videos are only meant as visual guides.
Gauge is important! Please adjust hook size to meet gauge of pattern.
Final pillow panel should measure approximately 23.5”.
Ch 2 counts as DC throughout pattern.
Ch 3 counts as tr throughout pattern.
Don’t forget to share your makes on Instagram and Facebook! I always love seeing what you have all worked up. Tag me on Instagram @nautikrallcrochet or Facebook @nautikrall_crochet, or use the hashtag: #basicsunflowerpillow
Schematic
Pillow Panel Dimensions: One Sunflower square worked until 23.5”
Pattern Starburst Sunflower Granny Square:
Make one square…
Round 1
With Colour A, ch 5.
Sl st into 5th ch from hook to create centre ring.
Ch 2, work 1 DC into centre ring, ch 1 (counts as first cl st).
Work eleven [2 DC cl sts] into the centre of the circle (12 cl sts).
Join with sl st to the ch-1 sp (between the first and second cl sts at beginning of rnd), Fasten off.
Round 2
Join Colour B into any ch-1 sp, ch 2.
Work 2 DC into same sp.
Work 3 DC into every ch-1 sp (36 DC sts).
Join rnd with sl st into the top of the first DC (not the ch-2), Fasten off.
Round 3
Join Colour C in between any two DC shells, ch 3.
Into same sp work a [4 tr cl, ch 3].
Work [5 tr cl, ch 3] into each sp between DC shells around (12 tr cl sts).
Sl st into the ch-3 sp (not the top of the cl st), Fasten off.
Round 4
Join Colour D into any ch-3 sp, ch 3.
[3 tr, ch 2, 4 tr] into same sp (1st corner).
*4 DC into next ch-3 sp, twice.
[4 tr, ch 2, 4 tr] into next ch-3 sp.*
Repeat from * to * 2 more times.
4 DC into next ch-3 sp, twice.
Join rnd with sl st into top of first tr (not the ch-3).
Do not fasten off…you are now ready for Rnds 5 -12.
***Please see the YouTube video tutorial below on how to make these starburst sunflower squares:
Round 5
Ch 2, DC into same sp, DC into each st along side of square.
Work [2 DC, ch 2, 2 DC] into corner sp.
*Work a DC into each st along side of square (16 sts).
Work [2 DC, ch 2, 2 DC] into corner sp.*
Repeat from * to * 2 more times.
Work a DC into each st along side of square (12 sts).
To join rnd, sl st into top of first DC (not the ch-2).
Do not fasten off…
Rnd 6-12
Repeat Rnd 5 (Note: the number of sts will increase with each rnd. Instead of 16 sts across; the next rnd will have 20, 24, 28 etc... Instead of 12 sts on the joining side, there will be 14, 16, 18 etc…)
***Please see the YouTube video tutorial below on how to make this sunflower pillow panel:
Assembling Finished Pillow Cover:
Final pillow panel should measure 23.5”
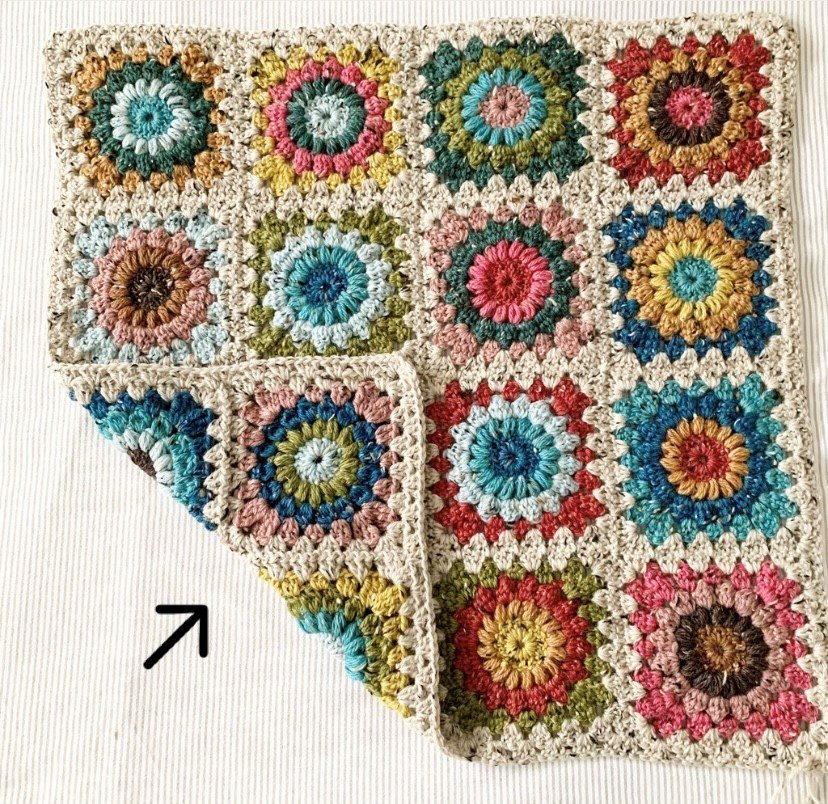
Place pillow cover down with wrong side up.
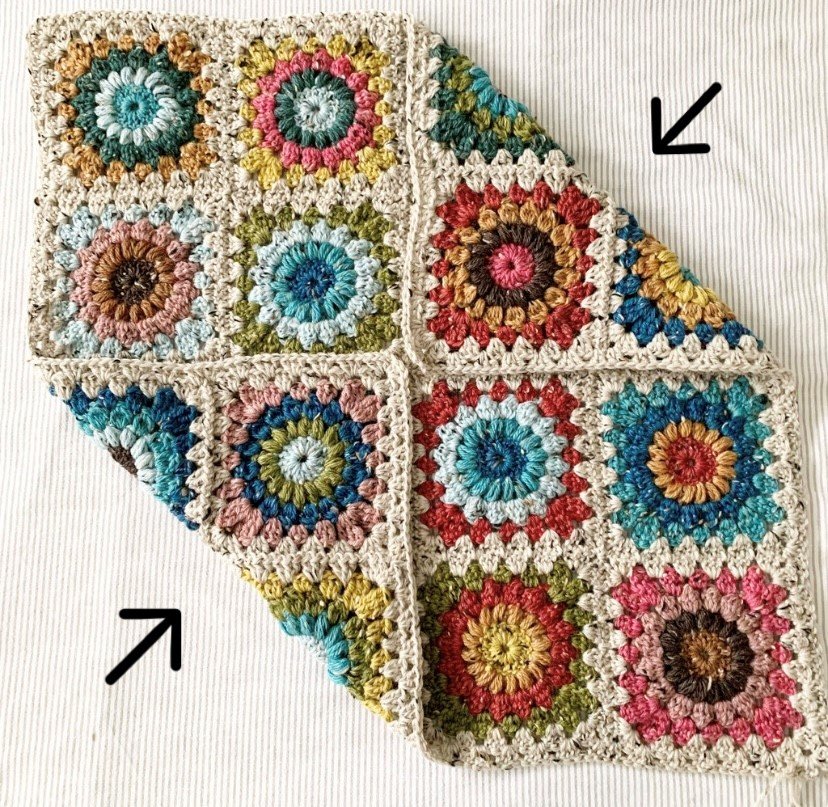
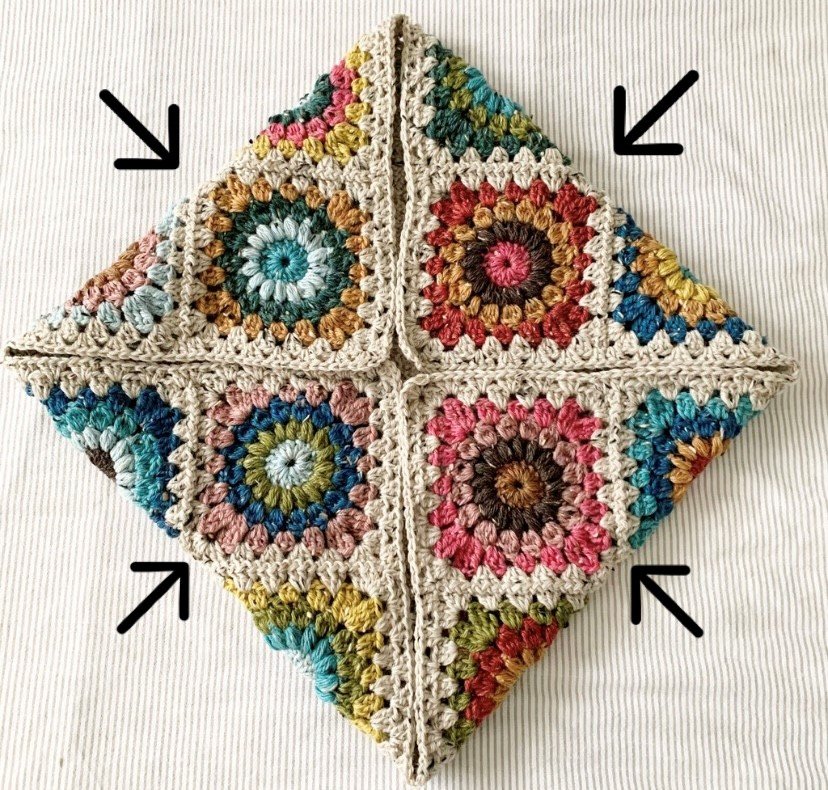
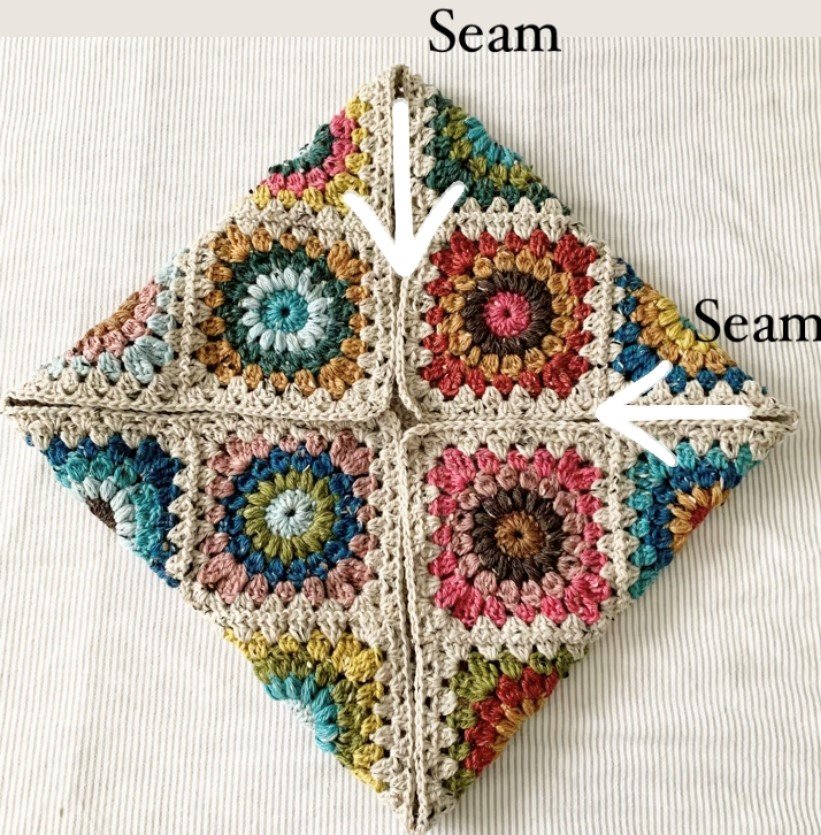
Fold corners of pillow cover into the centre; seam together using zig zag sl st.
On the final seam, remember to leave enough room to stuff your pillow into the cover before seaming all the way shut.
Fasten off, weave in all ends.
***please note: pictures were used from the Hygge Burst Pillow Pattern—yours will be a sunflower panel!
**Please see the video tutorial for how to seam/assemble pillow panel:
~The End~
The pattern, the photographs and video tutorials in this document are the property of NautiKrall Crochet. You may sell items you make from this pattern; but may not sell, reproduce, or distribute this pattern, in whole or in part, as your own.
Copyright © 2024 NautiKrall Crochet – All rights reserved.


