
Dockside Squares Throw- A Granny Square Blanket Pattern.


This post contains affiliate links. Affiliate links cost you nothing, but when purchasing through these links you help me earn a small commission. This supports me and my family and my continued efforts to bring you free patterns.
Intro:
As a crocheter-it may just be the first thing you learn to make. A granny square-as timeless as it is useful. For me the idea of Granny squares conjures up feelings of warmth, love and coziness. It reminds me of the back of Nans chair, holiday evenings and turkey naps. For me, it is quintessentially “Nan”-in a way that isn’t “Grandma-ish” but rather, a fond and knowing way that makes me well up with tears as I write this.
If you are someone who has been hesitant to try the traditional granny square blanket because colour combinations can be overwhelming, then this is the project for you! I’ve curated the colours, written out every single combination for you and included a handy chart so you know the exact placement of the squares. Now you can make the exact blanket as in the photos.
In keeping with the Nautical theme and having it remind me so much of a blanket you’d find at the cottage… I decided to name it the Dockside Squares Throw. I hope it conjures feelings of late summer/early autumn warmth, cool, cozy evenings, the gentle sound of water lapping at the dock and most importantly *love*. Love of colour, love of craft, love of crochet, love of squares and love to whomever receives this heirloom piece.
Happy crocheting beautiful humans :)
Yours,
M
ps. If you want the ad-free, printable PDF of the pattern you can grab one in my Shop, Ravelry or Etsy:

Notions
US 5.00 mm (size H) crochet hook
Needle for weaving in ends
Scissors
Yarn
Knit Picks Swish Worsted (110yds/50g):
Hollyberry (99yds/45g) 1 skein
Rose Heather (90yds/41g) 1 skein
Blossom Heather (93yds/42g) 1 skein
Conch (93yds/42g) 1 skein
Copper (90yds/41g) 1 skein
Allspice (93yds/42g) 1 skein
Honey (90yds/41g) 1 skein
Haystack Heather (90yds/41g) 1 skein
Green Tea Heather (99yds/45g) 1 skein
Dublin (90yds/41g) 1 skein
Estuary Heather (99yds/45g) 1 skein
Wonderland Heather (99yds/45g) 1 skein
Arctic (95yds/43g) 1 skein
Serene (95yds/43g) 1 skein
Karma Heather (90yds/41g) 1 skein
Throne (99yds/45g) 1 skein
Squirrel Heather (90yds/41g) 1 skein
Pinecone Heather (84yds/38g) 1 skein
Mimic (196yds/89g) 2 skeins
Bare (993yds/451g) 5 skeins
Gauge
4 round granny square= 3.25” or 8 cm square (unblocked)
Finished Size
43”x 53” blocked
Glossary (using US Crochet Terminology)
st(s)- stitch(es)
ch- chain
ch-sp- chain space
sl st- slip stitch
YO- yarn over
SC- single crochet
DC- double crochet
tr- treble crochet
cl st(s)- cluster stitch(es)
CJAYG- continuous join as you go
DC shell- group of DC stitches
WS- wrong side
RS- right side

Colour Legend


Pattern Notes
Ch 2 will count as a DC throughout.
The Colour Legend is my attempt to provide you with colour accurate photos/generic colour names that you can use if you’d like to find an alternative yarn (the actual yarn name will be provided below in brackets).
Gauge will affect yarn quantities. If your squares are larger than 3.25” inches square, you will require more yarn, please adjust hook size to meet gauge.
Please follow the written pattern for the granny square (rather than the tutorial). The tutorial was filmed long before I started writing patterns and is only meant to be a visual guide. There will be differences in the amount of chaining that occurs in the corners.
A note on why I use Bare Swish Worsted to join: Bare yarn is an un-dyed yarn that comes in 100g skeins rather than the smaller 50g skeins. I find this useful-but also, I think it’s silly to purchase a “white/off-white” colour that’s been dyed to be that way when there is a perfectly unprocessed yarn in the exact colour we need. You get more, for less—and it’s friendlier on the environment. It will need to be searched separately from the rest of the colours. At knitpicks.com put in the search “Bare Swish Worsted” and it’ll come up.
Each square in this blanket has an “opposite”. There are 60 unique colour combinations and the remaining 60 are the exact opposites of them. The opposite colour will be indicated in the Colour Combo Chart so that you can make the matching square while you have the colours out, if you wish.
Don’t forget to share your makes on Instagram and Facebook! I always love seeing what you have all worked up. Tag me on Instagram @nautikrallcrochet or Facebook @nautikrall_crochet, or use the hashtag: #soligpillowpattern
Pattern Graph/Schematic

Blanket Dimensions: 10 squares x 12 squares= 120 squares
*Squares are numbered to coordinate with the colour chart below. Please use this chart for final placement of squares.


Pattern Granny Square:
Rnd 1
With first colour, Ch 4.
Sl st into 4th chain from hook to create centre ring.
Ch 2, 2 DC into centre ring, *ch 1, 3 DC into centre ring.* Repeat * to * 2 more times.
Ch 1, sl st to top of first DC (not the ch 2), Fasten off.
Rnd 2
With WS facing, join new colour into any ch-1 corner sp.
Ch 2, 2 DC into ch-1 sp, ch 1, 3 DC into same sp.
Into next ch-1 sp work [3 DC, ch 1, 3 DC].
Repeat [ to ] 2 more times.
Sl st to first DC (not the ch 2), Fasten off.

Rnd 3
With WS of previous rnd facing, join new colour into any ch-1 corner sp.
Ch 2, 2 DC into ch-1 sp, ch 1, 3 DC into same sp.
*3 DC into next sp between DC shells.
Into next ch-1 sp work [3 DC, ch 1, 3 DC].*
Repeat from * to * 2 more times.
3 DC into next sp between DC shells.
Sl st to first DC (not the ch 2), Fasten off.
Rnd 4
With WS of previous rnd facing, join new colour into any ch-1 corner sp.
Ch 2, 2 DC into ch-1 sp, ch 1, 3 DC into same sp.
*3 DC into next sp between DC shells, twice.
Into next ch-1 sp work [3 DC, ch 1, 3 DC].*
Repeat from * to * 2 more times.
3 DC into next sp between DC shells, twice.
Sl st to first DC (not the ch 2), Fasten off.
***Please see the YouTube video tutorial below on how to make Granny Squares:
Assembling Blanket Squares (CJAYG)
With WS of the 4th rnd face up, lay out all squares in the arrangement from the colour graph above.
Using Bare Swish Worsted, start in the top right-hand corner to join squares across the rows.
Example: First row will be joined from square number 10 across to square number 1. The second row will start with square number 20 and be worked across to square number 11.
Following along with the video tutorial, crochet squares together until blanket is complete.
Once back to the start of the blanket (in the top right-hand corner)- DO NOT FASTEN OFF.
You are now ready to start border Round 1.
**Please see video tutorial below for how to join Granny Squares with CJAYG to create blanket:

Border
Round 1
Sl st over two sts into the ch-2 corner sp.
Ch 2, work [2 DC, ch 1, 3 DC] into corner sp.
Continue working 3 DC into each sp between DC shells around edge of blanket.
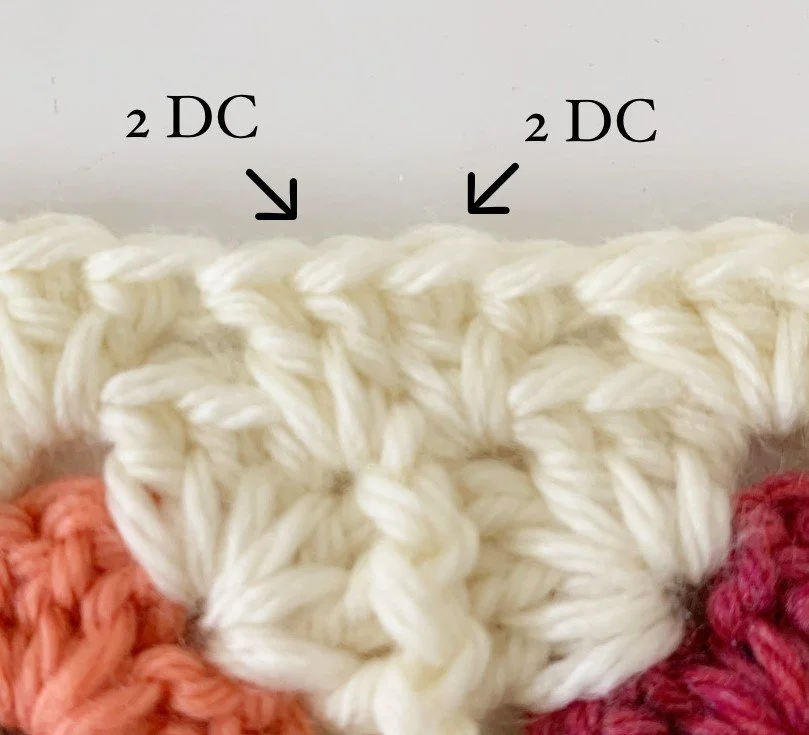
Into each join (where two squares meet); work 2 DC on either side.
Work [3 DC, ch 1, 3 DC] into each corner.
To join round, sl st into the top of the first DC (not into the ch 2), do NOT fasten off.
Round 2
Sl st over two sts into the ch-2 corner sp.
Ch 2, work [2 DC, ch 1, 3 DC] into corner sp.
Continue working 3 DC into each sp between DC shells around edge of blanket.
Work [3 DC, ch 1, 3 DC] into each corner.
To join round, sl st into the top of the first DC (not into the ch 2), do NOT fasten off.
Round 3
Repeat Round 2, Fasten off.
Round 4
Join new colour (Mimic) into any corner, ch 2.
Work [2 DC, ch 1, 3 DC] into corner sp.
Continue working 3 DC into each sp between DC shells around edge of blanket.
Work [3 DC, ch 1, 3 DC] into each corner.
To join round, sl st into the top of the first DC (not into the ch 2), do NOT fasten off.
Round 5
Complete one round of pom-pom border to finish off blanket.
Fasten off, weave in all ends.
***Please see the YouTube video tutorial below on how to crochet pom-pom border: How to Crochet Pom-Pom Border

~The End~
The pattern, the photographs and video tutorials in this document are the property of Nautikrall Crochet. You may sell items you make from this pattern; but may not sell, reproduce, or distribute this pattern, in whole or in part, as your own.
Copyright © 2022 Nautikrall Crochet – All rights reserved.
